1.Overview of Switch Bounce
Because the internal contacts of mechanical switches physically vibrate against one another when they are pressed or released, the electrical signal fluctuates quickly and briefly. The average bounce time ranges from 1 to 50 ms, depending on:
- Quality of buttons
- Speed of pressing
- Conditions of the environment
As a result, an Arduino might recognize several “press” events for a single physical movement.
2.The Significance of Debouncing
In microcontroller systems, bouncing can result in erroneous triggers that: Set off several interruptions erratically activate
and deactivate outputs create inconsistent behavior in control systems, counters, and menus In other words, your system starts to fail.
3.Techniques for Hardware Debounce
a) RC Low-pass Filter By removing quick, minor glitches, a resistor (R) and capacitor (C) can reduce Circuit: Typical pull-up resistor (10kΩ) Capacitor (~0.1µF) between GND and the button How it works: The capacitor charges and discharges slowly enough to filter out tiny faults when bouncing takes place.
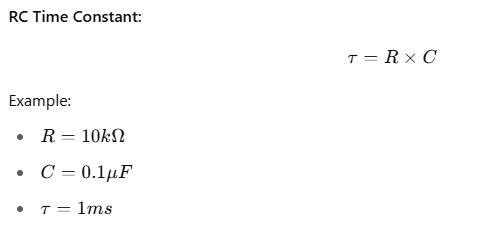
You want a time constant that is both short enough for a quick response and longer than the average bounce period.
b) The Schmitt Trigger
Make use of hardware that needs a distinct voltage threshold in order to change states:
- Hex Schmitt Trigger IC, 74HC14
- Hysteresis built in
- Eliminates erratic signals
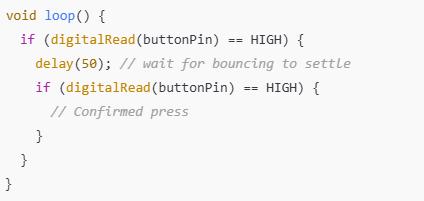
4.Techniques for Software Debounce
Software debounce is more adaptable and frequently enough on its own.
5.Event-driven and non-blocking
Debounce using millis() to verify time in a professional manner.
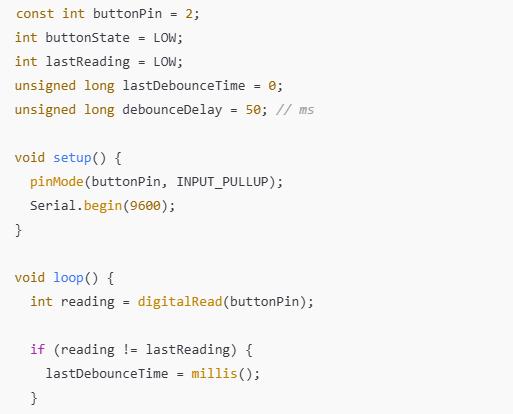
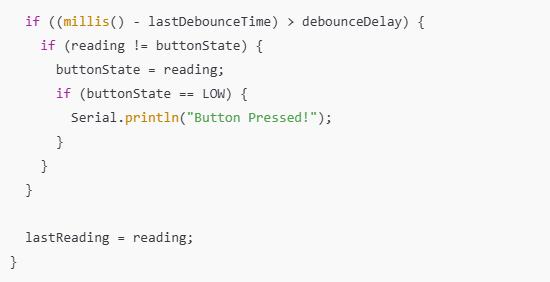
- Does not stop the execution
- For multitasking, ideal
- Many buttons and sensors are used.
6.Timing Details: How Long Is the Delay?
Debounce time selection is based on: Quality of the button (mechanical versus tactile) Reactivity of the project
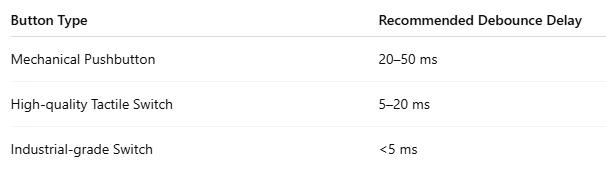
Over- Debouncing (too long) might impair
Responsiveness in essential systems!
7.Using Libraries for Debounce
All of the complexity is abstracted using the Arduino Bounce2 library:
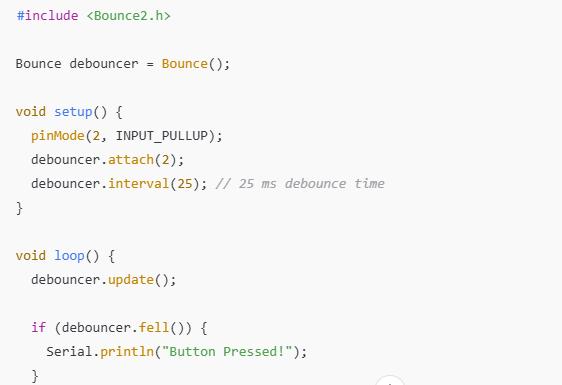
Advantages:
- Manages edges that rise and fallMultiple buttons are supported.
- Code that is cleaner
8.Top Techniques for Debouncing
Debounce mechanical switch inputs at all times. Use internal or external pull-up or pull-down resistors. Combine hardware and software debounce for projects requiring high reliability. For multitasking or real-time systems, use non-blocking debounce.
9.Complete Example:
Constructing a Trustworthy Button Toggle, with every legitimate press, Turn on an LED:
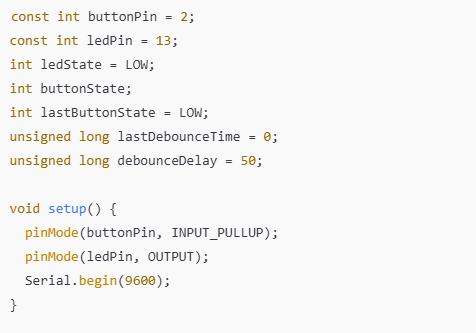
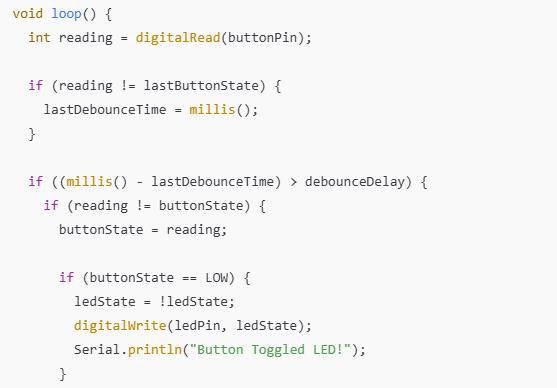
As a result, the LED reliably turns on and off with each physical press.
10.Concluding remarks
One of the first issues Arduino developers face is button bouncing, which can be fixed correctly to distinguish a professional project.
You now understand: The reasons behind bouncing
- How to use software and hardware to fix it
- How to debounce the Arduino loop without obstructing it
- How to put elegant, scalable button handling into practice
Your projects will behave much more consistently if you start clean and debounce everything!