Understanding the 8051 Microcontroller
The 8051 microcontroller is an 8-bit embedded controller that integrates a CPU, memory, timers, serial communication interface, and digital I/O ports on a single chip.
Originally developed by Intel, the 8051 became the foundation for thousands of embedded products and educational development kits. Even today, many engineering colleges and embedded systems training institutes use it as a starting point for teaching microcontroller fundamentals.
Some key reasons for its continued popularity include:
- Simple architecture
- Large learning community
- Easy hardware interfacing
- Availability of low-cost development boards
- Excellent support from Keil µVision

The 8051 Microcontroller Features:
- 8-bit CPU
- 4 KB ROM
- 128 bytes RAM
- 32 I/O pins
- Two 16-bit timers
- Full duplex UART for serial communication
These 8051 microcontroller features make it suitable for learning embedded systems concepts and implementing basic automation, communication, and control applications.
Architecture of 8051 Microcontroller
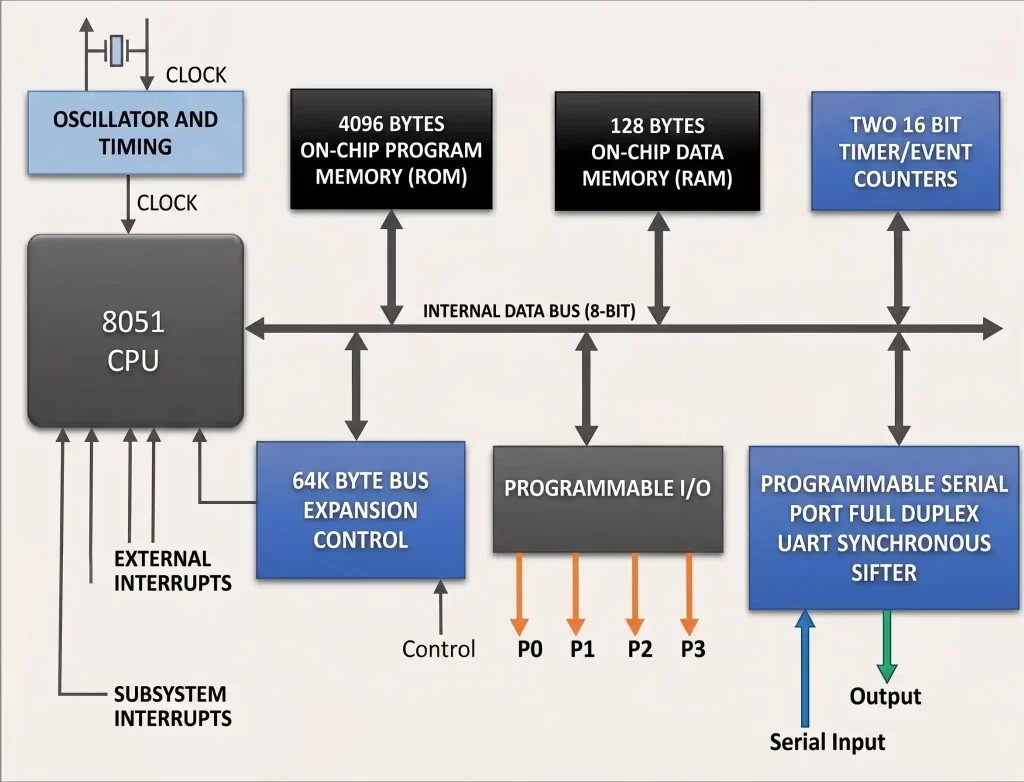
Central Processing Unit (CPU)
Within the 8051 microcontroller, the CPU carries out arithmetic and logic functions. It accesses instructions stored in ROM, interprets them, and executes them sequentially.
Memory Organization
With its Harvard architecture, the 8051 microcontroller utilizes distinct memory regions for program code (ROM) and data (RAM). This separation contributes to enhanced speed and efficiency in data management.
I/O Ports
The 8051 is equipped with four parallel I/O ports (P0, P1, P2, and P3), each consisting of 8 bits, which can be configured as input or output.
Timers/Counters
The microcontroller includes two 16-bit timers/counters, Timer 0 and Timer 1, which can be employed for timing tasks and tracking external events.
Serial Communication
A UART interface enables serial communication with external devices and systems.
Interrupt System
The 8051 includes five interrupt sources:
- Two external interrupts
- Two timer interrupts
- One serial communication interrupt
These allow the microcontroller to respond quickly to external events.
8051 Pin Diagram
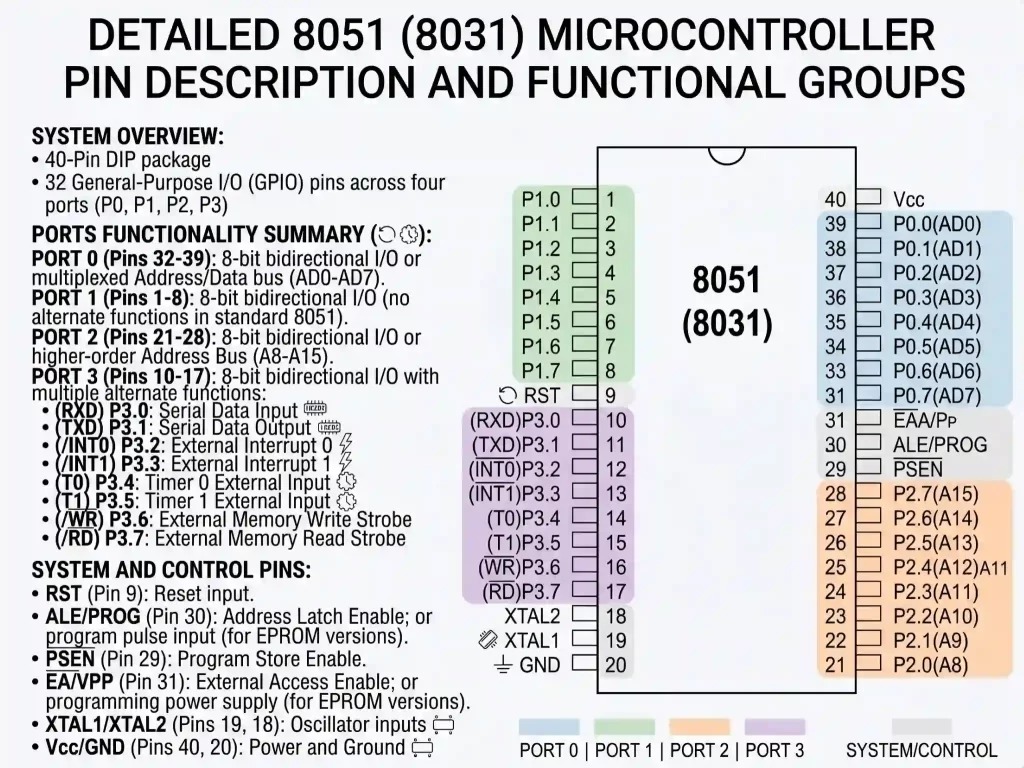
The 8051 pin diagram consists of 40 pins grouped into:
- Port 0
- Port 1
- Port 2
- Port 3
- Power pins
- Crystal oscillator pins
- Reset pin
- External memory interface pins
Understanding the pin functions is essential before designing any hardware project involving the 8051.
Packaging Types
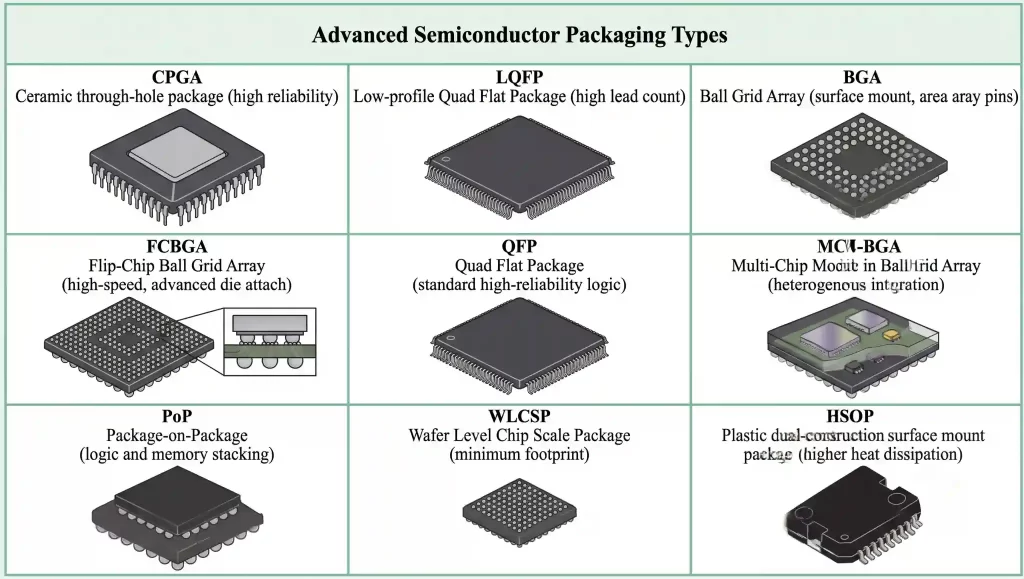
The 8051 microcontroller is available in multiple packaging formats depending on application requirements and manufacturing constraints.
What Is Keil µVision?
Keil µVision is an Integrated Development Environment (IDE) used to develop, compile, simulate, debug, and program embedded applications for microcontrollers.
For 8051 development, Keil provides:
- Embedded C compiler
- Assembler
- Source-level debugger
- Project management tools
- Device libraries
- HEX file generation
- Simulation environment
When students ask “what is Keil µVision?”, the simplest answer is that it serves as the complete software workspace where embedded applications are written and tested before being loaded onto the microcontroller.
Modern versions of Keil µVision 5.x continue to support 8051 devices while also supporting ARM-based processors.
Why Is Keil Software Popular for 8051 Development?
Compared to many alternative IDEs, Keil software for 8051 offers several advantages:
Benefits of Keil for 8051
Feature | Benefit |
Device Database | Easy device selection |
Built-in Simulator | Test code without hardware |
Debugging Tools | Faster troubleshooting |
HEX Generation | Ready for programming |
Industry Adoption | Widely used in training and industry |
From a training perspective, Keil reduces the learning curve because students can focus on embedded programming rather than toolchain configuration.
How to Program an 8051 Microcontroller Using Keil
Many beginners search for how to program an 8051 microcontroller using Keil because they want a practical workflow rather than theoretical explanations.
The process can be divided into six simple steps.
Step 1: Install Keil µVision
Download and install Keil µVision.
During installation:
- Install device support packages.
- Enable 8051 device support.
- Complete the IDE setup.
Step 2: Create a New Project
Open Keil µVision and:
- Click Project → New µVision Project
- Create a project folder
- Enter a project name
- Select your 8051 device
Choosing the correct microcontroller variant is critical because register definitions differ among devices.
Step 3: Create a Source File
Create a new C file and save it as:
main.c
Add the file to the project.
Step 4: Write Your First Program in Keil Software
If you’re wondering how to write a program in Keil software, an LED blinking project is usually the first exercise.
#include

sbit LED = P2^0;

void delay()
{
   int i,j;
   for(i=0;i<500;i++)

       for(j=0;j<1275;j++);
}

void main()
{
   while(1)
   {
       LED = 0;

       delay();

       LED = 1;

       delay();
   }
}
What This Program Does
- Connects an LED to Port 2
- Turns the LED ON
- Waits for a delay
- Turns the LED OFF
- Repeats continuously
This project introduces GPIO programming, delays, and program execution flow.
Step 5: Compile the Program
Click the Build button.
Keil will:
- Check syntax
- Compile source files
- Link project modules
- Generate machine code
If the compilation succeeds, no errors will appear in the output window.
Step 6: Generate the HEX File
Many beginners miss this step.
Open:
Project → Options for Target
Then:
Output Tab → Create HEX File
Enable this option before building.
The generated HEX file is the actual machine code loaded into the microcontroller.
Step 7: Program the 8051 Board
Use a programmer/debugger to:
- Connect the board
- Load the HEX file
- Flash the microcontroller
- Reset the board
- Observe the output
If everything is configured correctly, the LED should begin blinking immediately.
Keil µVision vs Other Embedded Development Environments
Feature | Keil µVision | MPLAB X | STM32CubeIDE |
8051 Support | Excellent | Limited | No |
Simulator | Built-In | Available | Available |
Beginner Friendly | High | Medium | Medium |
Industry Training Use | Very High | High | High |
Legacy Device Support | Excellent | Moderate | Low |
For pure 8051 development, Keil remains the preferred choice because of its mature compiler and debugging ecosystem.
How to Use 8051 Microcontroller Effectively in Real Projects
Learning syntax is only part of embedded development.
In real-world projects, developers combine multiple peripherals simultaneously.
A typical embedded lab project may involve:
- Reading sensor inputs
- Processing data
- Driving an LCD display
- Communicating through UART
- Controlling motors
For example, in an industrial temperature monitoring system, the 8051 reads sensor values, compares them against thresholds, displays readings on an LCD, and activates alarms when required.
This type of project teaches students how software interacts directly with hardware resources.
Explain 8051 Architecture: Understanding the Internal Blocks
Many students memorize the block diagram of 8051 but do not understand how the components work together.
Block | Function |
CPU | Executes instructions |
RAM | Stores variables |
ROM | Stores program code |
Timers | Timing and counting |
UART | Serial communication |
Interrupt Controller | Event handling |
I/O Ports | Hardware interfacing |
A practical way to visualize the architecture is to think of the CPU as the decision maker, memory as storage, and peripherals as communication channels between software and the outside world.
When debugging embedded systems, understanding these relationships becomes far more valuable than simply memorizing definitions.
Common Beginner Mistakes in 8051 Programming
1. Forgetting to Generate HEX Files
The code compiles successfully, but no executable file exists for programming.
Fix: Enable “Create HEX File” in project settings.
2. Selecting the Wrong Device
Different 8051 variants use different configurations.
Fix: Verify the exact microcontroller before creating the project.
3. Incorrect Crystal Frequency Assumptions
Delay calculations depend on oscillator frequency.
Fix: Always confirm the hardware clock frequency.
4. Improper Port Connections
Many LEDs, switches, and sensors fail due to incorrect wiring.
Fix: Verify schematics before debugging software.
8051 Applications in Modern Embedded Systems
Industrial Automation
- Conveyor belt controllers
- Motor control systems
- Process monitoring equipment
- PLC interfacing modules
Consumer Electronics
- Remote controls
- Digital clocks
- Home appliances
- Basic display controllers
Automotive Systems
- Dashboard control modules
- Sensor monitoring systems
- Vehicle communication interfaces
Communication Systems
- UART-based communication devices
- Serial data transfer modules
- Embedded networking applications
In embedded systems training, we often recommend starting with the 8051 before moving to ARM-based processors because it helps students understand low-level hardware concepts without the complexity of modern architectures.

8051 vs Arduino vs ARM Cortex-M: Which Should You Learn?
Feature | 8051 | Arduino (ATmega328P) | ARM Cortex-M |
Architecture | 8-bit | 8-bit | 32-bit |
Learning Curve | Beginner-Friendly | Beginner-Friendly | Intermediate |
Industry Relevance | Educational & Legacy Systems | Prototyping | Commercial Products |
Processing Power | Low | Moderate | High |
Memory Capacity | Limited | Moderate | Large |
Real-Time Applications | Basic | Moderate | Advanced |
Embedded Fundamentals | Excellent | Good | Excellent |
Cost | Low | Low | Moderate |
When Should You Learn 8051?
Choose the 8051 if you want to:
- Understand microcontroller fundamentals.
- Learn register-level programming.
- Master timers, interrupts, and UART communication.
- Build a strong foundation before learning ARM processors.
When Should You Move Beyond 8051?
After mastering 8051 concepts, students should explore:
- ARM Cortex-M controllers
- STM32 development boards
- ESP32-based IoT systems
- RTOS-based embedded development
From an industry perspective, most new embedded designs use ARM-based processors.
Trends and Future Relevance of 8051
The role of the 8051 has evolved significantly.
While it is no longer the first choice for advanced embedded products, it remains one of the most effective teaching platforms for embedded systems education.
Key Trends
- Increased use of simulation-based learning with Keil µVision.
- Growing emphasis on transitioning from 8051 to ARM Cortex-M architectures.
- Integration of embedded programming into IoT-focused training programs.
- Continued use of 8051 in academic laboratories and entry-level embedded projects.
At IIES Bangalore, we observe that students who understand 8051 architecture and embedded C concepts typically transition to ARM, STM32, and ESP32 platforms much faster than those who begin directly with complex 32-bit systems.

Conclusion
Learning 8051 microcontroller programming with Keil µVision remains one of the most effective ways to build a strong foundation in embedded systems development. The simplicity of the 8051 architecture, combined with the powerful development and debugging capabilities of Keil software for 8051, makes it an excellent platform for understanding how embedded hardware and software interact.
Whether your goal is to develop industrial automation systems, IoT devices, robotics applications, or pursue a career in embedded engineering, mastering the fundamentals of the 8051 provides valuable practical knowledge. Once you become comfortable with timers, interrupts, GPIOs, serial communication, and debugging in Keil, transitioning to advanced microcontrollers becomes significantly easier.
The best approach is to move beyond theory, build projects, experiment with hardware, and use Keil’s debugging tools extensively. Real embedded engineering skills develop when software meets hardware.