- Bluetooth Communication Bluetooth is a widely used wireless communication technology that allows devices to exchange data over short distances. It’s commonly used for creating wireless communication between Arduino boards and smartphones, tablets, or other Bluetooth-enabled devices. Popular Bluetooth Modules for Arduino:
HC-05:
A popular Bluetooth 2.0 module for serial communication with an Arduino
HC-06:
Similar to the HC05 but usually configured as a slave device
ESP32: A more powerful board with built-in Bluetooth (and WiFi), used for both Bluetooth and Wi-Fi communication.
Basic Arduino Bluetooth Project Example:
Materials Needed:
Arduino Uno or any Arduino board
HC-05 Bluetooth module
Jumper wires
Steps:
- Wiring the HC-05 to Arduino:
- Connect HC-05 TX to Arduino RX
- Connect HC-05 RX to Arduino TX
- Connect HC-05 VCC to 5V and GND to GND
- Programming the Arduino:Upload a basic Bluetooth code to your Arduino to send/receive data to/from the HC-05 Bluetooth module.
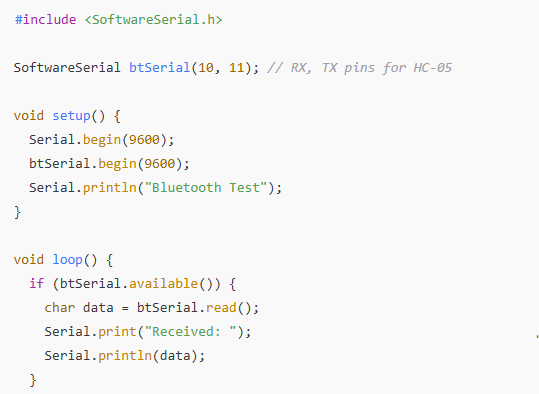
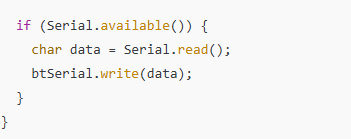
- Testing: Pair your smartphone or laptop with the HC-05 Bluetooth device. Use a Bluetooth terminal app (like Serial Bluetooth Terminal) to send data to Arduino.
- Wi-Fi Communication
WiFi communication allows Arduino to connect to the internet or a local network.
WiFi is commonly used in IoT (Internet of Things) projects, enabling devices to be remotely monitored and controlled.
Popular Wi-Fi Modules for Arduino: ESP8266: A lowcost WiFi module used to connect Arduino to Wi-Fi networks. ESP32: A more advanced module that supports both Wi-Fi and Bluetooth.
Basic Wi-Fi Project with ESP8266: Materials Needed: ESP8266 Wi-Fi module Jumper wires Arduino IDE with ESP8266 board manager installed
Steps: Wiring the ESP8266 to Arduino: Connect the ESP8266 to your Arduino using the appropriate pins. Programming the Arduino (using ESP8266): You can use the following example code to connect your ESP8266 to a Wi-Fi network.
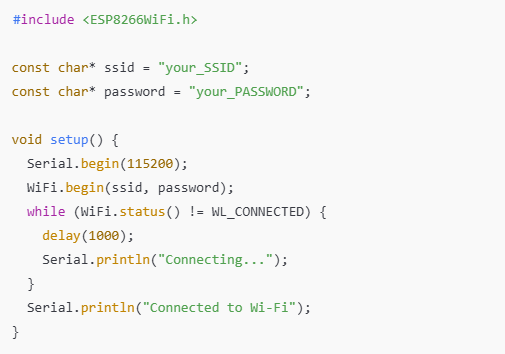
Testing: Upload the code to the ESP8266 using Arduino IDEOpen the serial monitor to verify if the ESP8266 connects successfully to the Wi-Fi network.
- RF Communication (Radio Frequency)
RF communication is typically used for short-range wireless communication between devices. Modules like the NRF24L01 are used for creating simple wireless communication networks with low power consumption. Popular RF Modules for Arduino: NRF24L01: A low-power, low-cost RF transceiver that can be used for point-to-point or multi-node communication. RF433 MHz
Transmitter/Receiver: Simple RF modules used for communication over short distances. Basic RF Communication with NRF24L01: Materials Needed:
Arduino Uno
NRF24L01 module
Jumper wires
Steps: Wiring the NRF24L01 to Arduino: Connect the NRF24L01 to the Arduino using SPI pins (MISO, MOSI, SCK, CE, CSN). Install the RF24 Library: You need to install the RF24 library in Arduino IDE to interact with the NRF24L01.

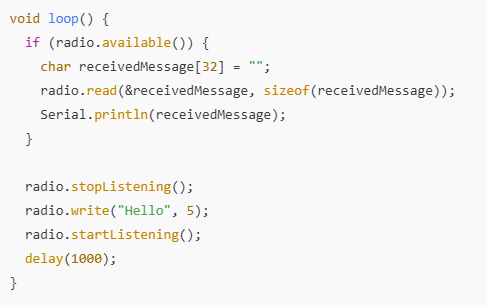
Testing: Upload the code to two Arduino boards, one transmitting and one receiving. Observe the messages being transmitted and received.
Additional Resources: Arduino IDE: To write and upload your code to the Arduino. Arduino Libraries: Many of these modules require additional libraries that can be installed through the Arduino IDE’s Library Manager (e.g., SoftwareSerial, RF24, ESP8266WiFi).