Step 1: Setting Up the Development Environment
Before we dive into the implementation, you need to set up your development environment. The essential tools are:
- STM32CubeIDE: This is an integrated development environment (IDE) that combines the STM32CubeMX graphical configurator and the Eclipse-based IDE. It provides a comprehensive development platform for STM32 applications.
- STM32CubeMX: This is a graphical tool that allows you to configure STM32 peripherals and generate initialization code.
- STM32 HAL Library: The Hardware Abstraction Layer (HAL) library provides high-level APIs for interacting with STM32 peripherals.
You can download STM32CubeIDE from the STMicroelectronics website and install it on your computer. Once installed, you can create a new project for your STM32 microcontroller.
Step 2: Configuring UART Peripheral Using STM32CubeMX
- Create a New Project: Open STM32CubeIDE, and create a new STM32 project. Select your specific STM32 microcontroller or development board.
- Configure UART: In the Pinout & Configuration tab, click on the UART peripheral you intend to use (e.g., USART1, USART2). This will automatically assign the TX and RX pins. You can customize these pins if needed.
- Set UART Parameters: In the Configuration tab, set the UART parameters such as baud rate, word length, stop bits, parity, and hardware flow control. For typical applications, a baud rate of 9600, 8 data bits, no parity, and 1 stop bit (9600-8-N-1) is commonly used.
- Generate Code: Once the UART configuration is complete, click on the “Project” tab, give your project a name, and select the toolchain (STM32CubeIDE). Click “Generate Code” to create the project with the necessary initialization code.
Step 3: Writing the UART Communication Code
Now that the project is set up with the necessary initialization code, you can start writing the code to implement UART communication.
- Initialize UART: The generated code will include the initialization function for the UART peripheral. Ensure this function is called in the
main.c file. - Transmit Data: To send data over UART, you can use the
HAL_UART_Transmit function. This function requires the UART handle, a pointer to the data buffer, the length of the data, and a timeout value. - Receive Data: To receive data, use the
HAL_UART_Receive function. This function requires the UART handle, a pointer to the buffer where the received data will be stored, the length of the data to be received, and a timeout value.
Step 4: Testing UART Communication
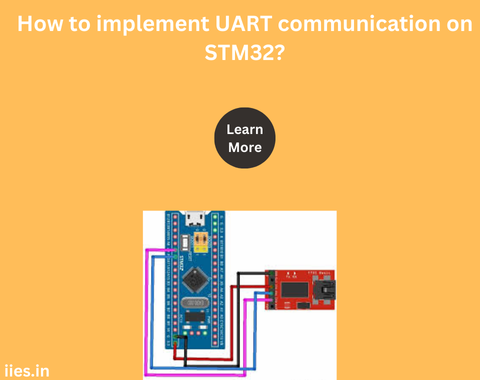
To test the UART communication, you need a way to visualize the data being sent and received. One common method is to use a USB-to-serial adapter to connect the STM32 microcontroller to a computer. You can then use a terminal program (such as PuTTY, Tera Term, or the Arduino Serial Monitor) to view the transmitted data and send data to the microcontroller.
- Connect the Hardware: Connect the TX pin of the STM32 to the RX pin of the USB-to-serial adapter, and the RX pin of the STM32 to the TX pin of the adapter. Also, connect the ground pins.
- Open a Terminal Program: On your computer, open the terminal program and configure it with the same UART settings (baud rate, data bits, parity, stop bits) as your STM32 configuration.
- Run the Program: Load the code onto the STM32 microcontroller and run it. You should see the transmitted data on the terminal program. You can also type data in the terminal to send it to the STM32.

