Arduino Contribution to IOT Data Collection
Arduino can connect to a variety of sensors to get information from the real world.
Transmission of Data: Using Wi-Fi (ESP8266), Bluetooth (HC-05), or cellular (SIM800) modules, Arduino can send collected data to the cloud or receive commands.
Control Instruments: Arduino is able to direct actuators—such as motors and relays—to carry out actions like turning on lights or adjusting thermostats based on the data it receives.
Communication Protocols Data transfer is essential for IOT applications using communication protocols.
Some important protocols are:
HTTP/HTTPS: Common for APIs on the web; can be used to communicate using REST.
MQTT: A lightweight messaging protocol that works well in networks with high latency and low bandwidth.
CoAP: Designed to accommodate restricted devices and networks, it is ideal for IOT environments.
WebSocket: Provides channels for full-duplex communication by making use of a single TCP connection.
Data Management IOT data processing and analysis relies heavily on effective data management
It entails:
Storage of data: Data can be stored for later analysis on local servers or cloud platforms like AWS, Azure, or Google Cloud.
Processing of Data: Using real-time or batch processing to analyze data for insights, patterns, or actions.
Visualization: Thing speak and Grafana, for example, are dashboards and tools for showing trends in data and making decisions easier.
Security concerns IOT devices frequently face a variety of threats
Important aspects of safety include:
Authentication: Ensuring that the network can be connected to by only authorized devices.
Encryption of Data: Protecting data while it is being transmitted to prevent unauthorized access.
Periodic Updates: Updating software and firmware to fix security holes.
Securing the Network: Putting in place intrusion detection systems and firewalls to protect IOT networks
Interface
An Arduino must be connected to the internet in order to interface with IOT systems. Data must be sent and received via a cloud service. Here’s a detailed guide on how to accomplish this successfully:
Select the IOT Platform
It dictates how you will gather, examine, and present data, choosing the appropriate IOT platform is essential. These are a few popular platforms:
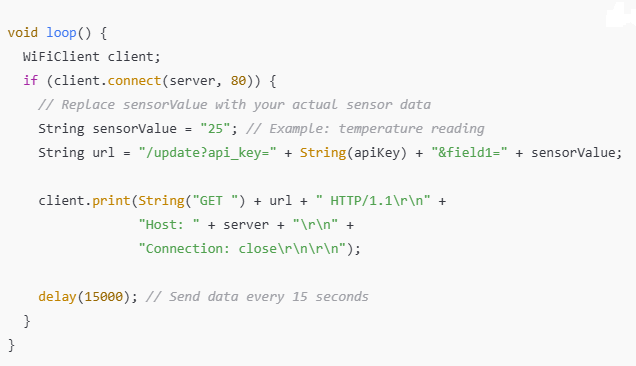
Thingspeak: Great for basic data visualization and logging, particularly in educational projects.
Adafruit IO: Visualization-focused, easy to use, and excellent for rapid prototyping.
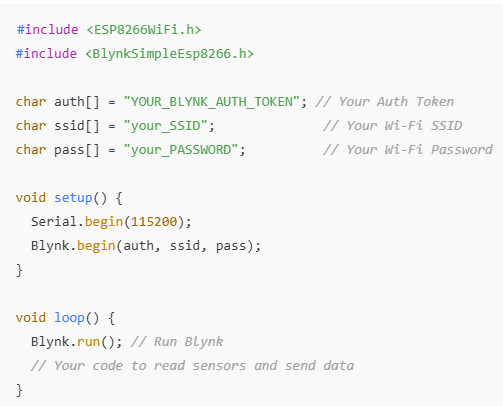
Blynk: Made for creating mobile apps that make it simple to monitor and control using cellphones.
IBM Watson IOT: Supports machine learning and advanced analytics, making it more reliable for enterprise solutions.
AWS IOT: Utilizing Amazon’s cloud services for a wide range of capabilities, this platform is appropriate for scalable applications
Obtain the Required Hardware In order to interface an Arduino with IOT platforms, the following hardware is required:
Board of Arduino: The Arduino Uno, Nano, and Mega are all well-liked options.
Wireless Module: If your Arduino does not have Wi-Fi built in, you might want to use:
ESP8266: a low-cost, Arduino-compatible Wi-Fi microchip.
ESP32: a successor to the ESP8266 that is more powerful and has more features (like Bluetooth and more GPIO pins).
Ethernet Safeguard: An Ethernet shield can be used to connect to the internet if you prefer a wired connection.
Sensors/Actuators: based on your project (temperature sensors, humidity sensors, relays, for example).
Install the Arduino IDE after setting up the Arduino environment: The place where you will write and upload your code is the Integrated Development Environment (IDE). From the Arduino website, you can download it.
Install Required Software: Typically, specific libraries are required by each IOT platform.
The Arduino IDE’s Library Manager can be used to install libraries:
For instance, to utilize the ESP8266, install it by searching for “ESP8266WiFi.”
Install the Blynk library for Blynk.
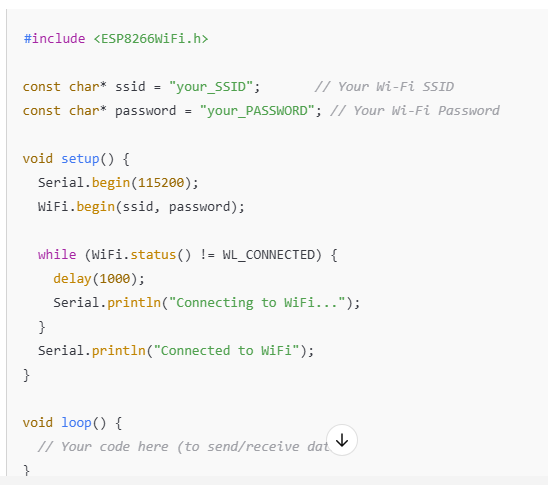
Connect the Arduino to WI-FI
- Connect the Wi-Fi network with a Wi-Fi module like the ESP8266.
EXAMPLE


