Unveiling the Magic of IR Sensors with Arduino: A Comprehensive Guide

Unveiling the Magic of IR Sensors with Arduino: A Comprehensive Guide

INTRODUCTION

In the vast realm of electronics, the marriage of Arduino and IR (Infrared) sensors has given birth to a multitude of innovative projects. From home automation to robotics, IR sensors play a pivotal role in detecting and responding to infrared radiation, making them indispensable in various applications. In this article, we delve into the world of IR sensors and explore how they can be seamlessly integrated with Arduino for exciting and practical projects

IR sensors operate on the principle of detecting infrared radiation, which is emitted by all objects with temperatures above absolute zero. They consist of an emitter and a receiver. The emitter emits infrared radiation, and the receiver detects the radiation reflected or emitted by nearby objects.

Understanding IR Sensors

The most common types of IR sensors include passive infrared (PIR) sensors, which detect changes in infrared radiation, and infrared distance sensors, which measure the distance between the sensor and an object based on the time it takes for the emitted infrared signal to return.

Components of an IR Sensor

1. Emitter: The emitter is responsible for emitting infrared light. In IR sensor modules, an IR LED serves as the emitter.

2. Receiver: The receiver is equipped with a photodiode to detect the infrared radiation. When an object reflects or emits infrared light, the photodiode generates a corresponding electrical signal.

3. Signal Processing Circuit: This circuit processes the electrical signal from the receiver and produces an output that can be easily interpreted by a microcontroller, such as Arduino.

Connecting IR Sensor with Arduino

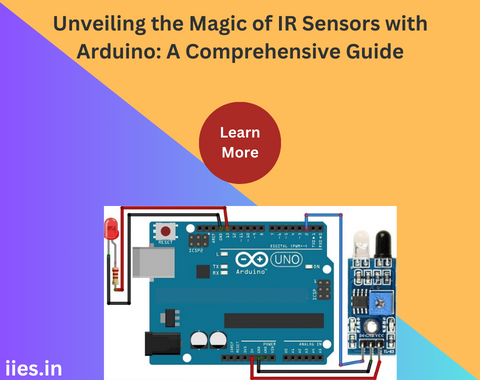
Integrating an IR sensor with Arduino is a straightforward process. Most IR sensor modules come with three pins: VCC (power), GND (ground), and OUT (signal). Connect the VCC pin to the 5V output on Arduino, the GND pin to the ground, and the OUT pin to any of the digital input pins on Arduino.

Basic Code for IR Sensor

This simple Arduino code reads the digital signal from the IR sensor and prints whether an object is detected or not on the serial monitor.

Applications of IR Sensors with Arduino

1.Obstacle Avoidance in Robotics:
IR sensors are commonly used in robotics for obstacle avoidance. By placing IR sensors on the robot, it can detect obstacles in its path and change its direction accordingly.

2. Home Automation:
IR sensors find applications in home automation systems. They can be used to control lights, fans, or any electronic device based on the presence or absence of a person in a room.

3. Security Systems:
PIR sensors, a type of IR sensor, are widely used in security systems. They can detect motion in their field of view, triggering alarms or cameras.

4. Proximity Sensing:
IR distance sensors are employed for proximity sensing. They can measure the distance between the sensor and an object, enabling touchless control in various applications.

5. Remote Control Emulation:
Arduino, in conjunction with IR sensors, can be programmed to emulate remote controls. This allows for the creation of custom universal remotes for multiple devices.

Advanced Techniques with IR Sensors

1. Gesture Recognition:
By combining multiple IR sensors and advanced algorithms, it’s possible to create gesture recognition systems. This technology is utilized in smart TVs and interactive displays.

2. Line Following Robots:
IR sensors are crucial in designing line-following robots. The sensors detect lines on the ground, enabling the robot to follow a predefined path.

3. Temperature Measurement:
IR sensors can be used for non-contact temperature measurements. This is particularly useful in industrial settings for monitoring equipment and processes.

Challenges and Considerations

1. Ambient Light Interference:
IR sensors may be affected by ambient light, potentially leading to false readings. To mitigate this, one can modulate the IR signal and use a demodulation technique in the receiver circuit.

2. Limited Range:
The range of IR sensors is limited, and they may not work well in environments with extreme temperatures or in the presence of certain materials. Understanding these limitations is crucial for effective deployment.

Conclusion

In the realm of electronics, the combination of IR sensors and Arduino has unlocked a treasure trove of possibilities. From enhancing the capabilities of robots to enabling smart home systems, the applications are diverse and ever-expanding. As technology continues to advance, we can expect even more sophisticated uses of IR sensors with Arduino, pushing the boundaries of innovation in the world of electronics. So, whether you’re a hobbyist or a seasoned engineer, dive into the exciting world of IR sensors and Arduino, and let your creativity soar.