IOT: Why Use the 8051 Microcontroller?
Although the 8051 microcontroller was first released in the 1980s, its widespread availability, low power consumption, and ease of use have kept it in use for many years. The 8051 is still a common option for straightforward and reasonably priced Internet of Things devices, despite the introduction of more potent microcontrollers like the ARM Cortex-M and ESP32.
Benefit of 8051 in IOT
Cost-effective IOT Benefits: The 8051 is a great option for low-budget IOT projects due to its low cost and wide availability.
Low Power Consumption: The sleep modes and effective architecture of the 8051 microcontroller make it perfect for applications requiring low power operation, which is a requirement for many Internet of Things devices.
Simple and Reliable: The 8051 architecture is a dependable platform for Internet of Things applications because it is straightforward, well-documented, and has been in use for a long time.
Development Tools Are Available: Working with the 8051 is made simple by a number of development tools, including the Keil IDE and different hardware development kits.
Essential Elements for Using the 8051 to Build IOT Systems
Some extra parts and modules are usually needed for data collection, communication, and actuation when using the 8051 microcontroller in an Internet of Things application. Sensors, actuators, communication modules, and cloud integration tools are some of these parts.
- Data Collection Sensors: Sensors are essential for collecting real-world data for Internet of Things applications. The following sensors may be used, depending on the application:
Temperature sensor (such as the DHT11 or LM35)
Humidity Sensor (DHT22, for example)
Gas Sensor (MQ series, for example)
Motion Sensor (PIR sensor, for example)
Light Sensor (LDR, for example)
- Modules for Communication
Although the 8051 lacks Bluetooth and Wi-Fi, it is simple to interface external communication modules with it to enable Internet of Things functionality.
- The ESP8266/ESP32 Wi-Fi Module enables the 8051 to send and receive data and establish a connection to the internet.
- For Internet of Things applications, the Bluetooth Module (HC-05/HC-06) offers short-range wireless communication.
- For low-power wireless communication applications, use RF modules (nRF24L01).
- Control Actuators
Actuators respond to user commands or sensor data to take action.
Typical actuators consist of:
Motors: Used in mechanical system control
Relays: Used to turn on and off appliances like fans and lights.
Servos: Used in robotics and other applications for precise movement control.
- Integration with Cloud
- Integration with cloud platforms such as ThingSpeak, Blynk, or AWS IOT is required for data storage, analysis, and visualization in order to increase the power of the IOT device.
- To transmit data from the 8051 to the cloud, communication modules such as the ESP8266 or ESP32 must be used.
An example of a basic IOT project
Remote Monitoring of Temperature and Humidity Goal: Construct a system that uses an 8051 microcontroller to track a room’s temperature and humidity levels and transmit the information to the cloud for real-time tracking.
A development board and an 8051 microcontroller are required components:
- ESP8266 Wi-Fi Module with DHT11 Temperature and Humidity Sensor
- Jumper wires and a breadboard
- Power Supply
- Cloud Data Monitoring ThingSpeak Account
How to Create the System:
Step 1: Connecting the Parts Attach the 8051 microcontroller to the DHT11 sensor:
VCC to 5V
GND to Ground
Data pin to an 8051 digital pin (such as P1.0).
Attach the 8051 microcontroller to the ESP8266 Wi-Fi module:
VCC and CH_PD pins to 3.3V (note that the ESP8266 requires a voltage regulator to function at 3.3V).
GND to Ground
TX pin to 8051 RX pin to 8051 TX pin (using a voltage divider if necessary)
RX pin to 8051 TX pin (using an appropriate level shifter)
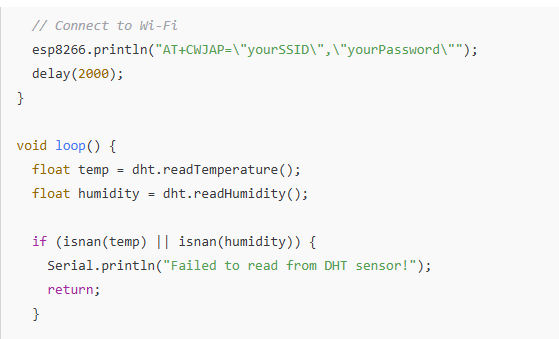
Step 2: The 8051 Microcontroller is programmed
To retrieve data from the DHT11 sensor, write code in Assembly or C. Use a library to interface with the sensor, such as DHT.h.
Set up the 8051 to process and format the temperature and humidity sensor data before sending it. To transmit the data to the ThingSpeak cloud platform, connect to the ESP8266 module.

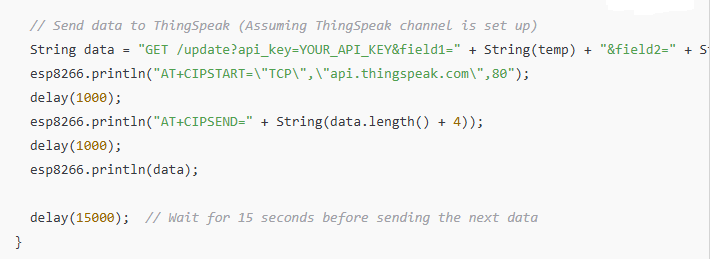
Step 3: Keep an eye on ThingSpeak data
After the code has been uploaded and activated, ThingSpeak will receive the temperature and humidity data, which you can view in real time through the ThingSpeak dashboard.
In conclusion
When paired with sensors and communication modules, the 8051 microcontroller can be a potent platform for creating dependable and reasonably priced Internet of Things devices. It might not be as computationally powerful as more recent microcontrollers, but its ease of use, low power consumption, and simplicity make it an excellent option for a variety of Internet of Things applications. Building an Internet of Things system to track and manage real-world variables is simple when you use tools like the ESP8266 Wi-Fi module and cloud platforms like ThingSpeak.