What is Raspberry Pi?
Raspberry Pi is a single-board computer that runs on a Linux-based operating system. It is capable of performing tasks such as programming, networking, automation, and real-time data processing.
It is widely used in:
- Embedded systems development
- IoT-based applications
- Robotics and automation
- Industrial monitoring systems
The key advantage is its ability to combine hardware interfacing with software processing in one platform.

Raspberry Pi Architecture Overview
The architecture of Raspberry Pi is built around a System on Chip (SoC) design. This means multiple components such as CPU, GPU, and memory controller are integrated into a single chip.
Key Architectural Elements
- ARM-based processor for computation
- Integrated GPU for graphics processing
- RAM for temporary data storage
- Peripheral interfaces for communication
- Networking module for internet connectivity
This integration makes Raspberry Pi efficient, compact, and suitable for real-world applications.
Raspberry Pi Block Diagram (Overview)
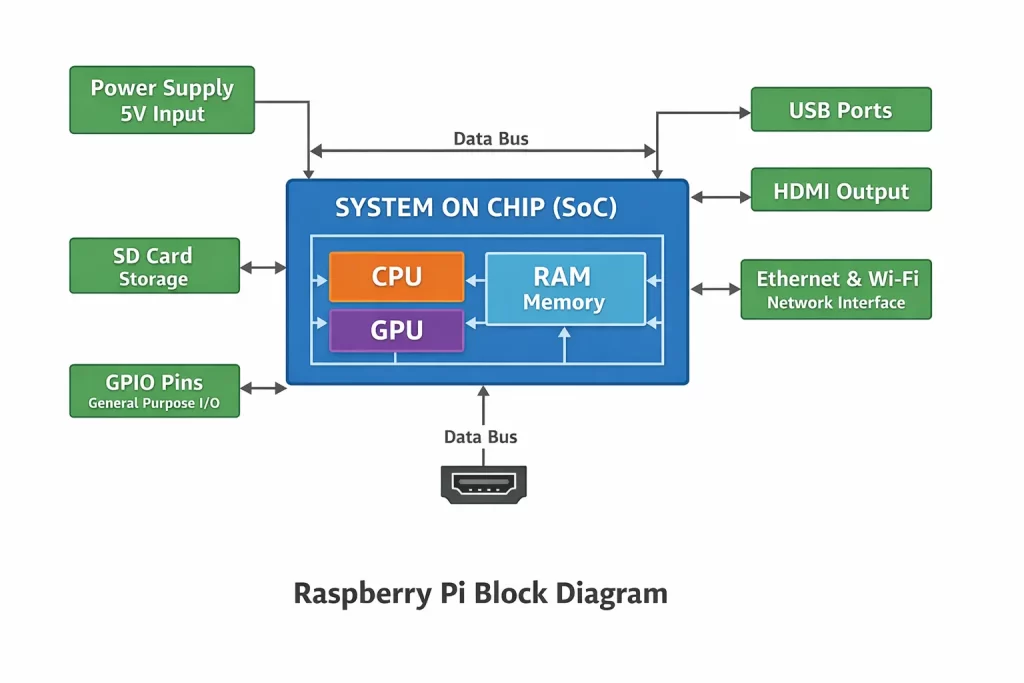
The block diagram represents how different internal components of Raspberry Pi are connected and interact with each other.
Detailed Explanation of Raspberry Pi Block Diagram
1. Processor (CPU)
The CPU is the central unit responsible for executing instructions. The Raspberry Pi 4 Model B uses a powerful ARM Cortex processor capable of multitasking.
It performs:
- Arithmetic operations
- Logical processing
- Control of peripherals
2. System on Chip (SoC)
The SoC integrates CPU, GPU, and memory controller into a single chip.
Benefits:
- Reduced power consumption
- Compact design
- Faster communication between components
This is a critical concept in modern embedded systems.
3. Memory (RAM)
RAM temporarily stores data required for running programs and operating system processes.
Higher RAM improves:
- Multitasking
- Application performance
- System responsiveness
4. GPIO (General Purpose Input Output)
GPIO pins allow interaction with external hardware components.
Functions:
- Read sensor data
- Control actuators
- Interface with external modules
GPIO is the most important feature for IoT and embedded applications.
5. USB Interface
USB ports enable connection of:
- Keyboard and mouse
- External storage devices
- Sensors and modules
They extend the functionality of Raspberry Pi.
6. HDMI Interface
HDMI allows connection to a display monitor, enabling Raspberry Pi to function like a desktop computer.
7. Power Supply Unit
The board is powered using a 5V supply. Stable power is essential to avoid system crashes or malfunction.
8. Network Interface
Raspberry Pi supports:
This enables communication with cloud platforms and IoT systems.
How Data Flows Inside Raspberry Pi
Understanding data flow is crucial for both practical applications and interviews.
- Input is received from GPIO or USB devices
- Data is transferred to CPU via internal bus
- CPU processes the data
- RAM stores temporary information
- Output is sent to display, GPIO, or network
This continuous cycle allows Raspberry Pi to operate as a complete computing system.

Communication Interfaces in Raspberry Pi
Raspberry Pi supports multiple communication protocols:
- I2C (Inter-Integrated Circuit)
Used for communication with sensors and low-speed devices.
- SPI (Serial Peripheral Interface)
Used for high-speed communication with peripherals.
- UART (Universal Asynchronous Receiver Transmitter)
Used for serial communication between devices.
These interfaces make Raspberry Pi highly flexible for hardware projects.
Working Principle of Raspberry Pi
The working process can be summarized as:
- Power is supplied to the board
- Bootloader initializes hardware
- Operating system loads from SD card
- CPU starts executing programs
- Input and output operations begin
This process allows it to function like a full-fledged computer.
Raspberry Pi vs Microcontroller Architecture
Understanding this comparison is important for students.
| Feature | Raspberry Pi | Microcontroller |
|---|
| Type | Microprocessor-based | Microcontroller-based |
| OS | Runs Linux | No OS |
| Processing Power | High | Limited |
| Applications | Complex systems | Simple control tasks |
Raspberry Pi is ideal for advanced applications, while microcontrollers are used for real-time control systems.
Real-World Applications of Raspberry Pi
Raspberry Pi is widely used in industry and projects:
- Smart home automation systems
- IoT-based monitoring solutions
- Robotics control systems
- Surveillance and security systems
- Edge computing applications
These use cases demonstrate its practical importance in modern technology.
Common Mistakes Beginners Make
Many learners misunderstand Raspberry Pi. Common mistakes include:
- Treating it like a microcontroller
- Ignoring proper power supply requirements
- Misusing GPIO pins
- Not understanding operating system usage
Avoiding these mistakes improves project success.
Raspberry Pi Interview Questions
- Explain Raspberry Pi block diagram
- What is SoC in Raspberry Pi?
- How does Raspberry Pi boot?
- Difference between Raspberry Pi and Arduino
- What are GPIO pins used for?
Raspberry Pi Training in Bangalore
For practical learning, hands-on experience is essential. If you are looking to build a career in embedded systems and IoT, structured training can help you gain industry-ready skills.
Training programs focused on Raspberry Pi, IoT, and embedded systems provide real-time project exposure and placement-oriented learning.
Conclusion
The Raspberry Pi block diagram is the foundation for understanding how this powerful single-board computer operates. By learning its architecture, components, and internal working, you can build real-world applications and prepare effectively for technical interviews.
This knowledge bridges the gap between theoretical learning and practical implementation in embedded systems.