Understanding Ultrasonic Sensor Fundamentals
An ultrasonic sensor is an electronic device that measures distance by emitting high-frequency sound waves and calculating the time taken for the echo to return after hitting an object. These sound waves operate beyond the audible range of the human ear (typically above 20 kHz).
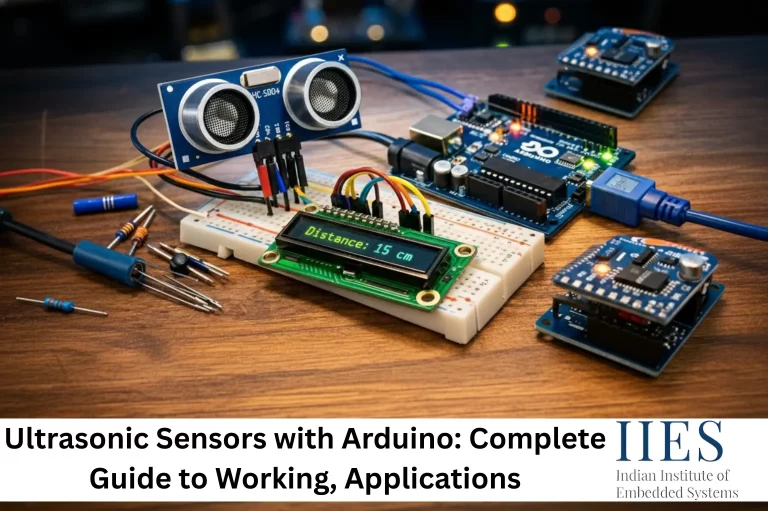
The most commonly used ultrasonic sensor with Arduino is the HC-SR04, known for its reliability and low cost.
Evolution of Ultrasonic Sensing Technology
Ultrasonic sensing technology has evolved significantly over the years:
Early industrial sensors were bulky, expensive, and limited to specific applications.
With advancements in MEMS technology and signal processing, ultrasonic sensors became smaller, more accurate, and energy-efficient.
Modern ultrasonic sensors are now widely used in automotive parking systems, drones, robotics, IoT devices, and smart home applications.
Integration with microcontrollers like Arduino has made ultrasonic sensing accessible to students, makers, and startups.
This evolution has transformed ultrasonic sensors from niche industrial tools into everyday electronic components.

Working Principle of Ultrasonic Sensors
Ultrasonic sensors operate on the principle of echolocation, similar to how bats navigate in darkness.
Step-by-Step Working
The sensor emits an ultrasonic pulse through the transmitter.
The sound wave travels through the air until it hits an object.
The wave reflects back toward the sensor.
The receiver detects the returning echo.
The sensor calculates the time delay.
Distance is calculated using the formula:
Distance = (Speed of Sound × Time) / 2
Since the sound travels to the object and back, the total time is divided by two.
Internal Building Blocks of an Ultrasonic Sensor
Transducer
The transducer acts as both a transmitter and receiver. It converts electrical signals into ultrasonic waves and vice versa.
Control Circuit
The control circuit handles pulse generation, timing, and synchronization between transmission and reception.
Signal Processing Unit
This unit processes the received echo signals, filters noise, and calculates the distance accurately.
Microcontroller Interface
Ultrasonic sensors are designed to easily interface with microcontrollers like Arduino using simple digital pins (Trigger and Echo).
Interfacing Ultrasonic Sensor Arduino Modules
Arduino provides an ideal platform for working with ultrasonic sensors due to:
Easy-to-use programming environment
Wide community support
Compatibility with multiple sensors
Availability of libraries for faster development
Basic Pin Connections (HC-SR04 Example)
VCC → 5V
GND → Ground
Trigger → Digital Output Pin
Echo → Digital Input Pin
In a typical ultrasonic sensor Arduino setup, Arduino sends a trigger pulse and measures the echo duration to calculate distance.
Practical Arduino Projects Using Ultrasonic Sensor Arduino
Distance Measurement System
One of the most basic and educational projects involves displaying distance measurements on the serial monitor, LCD display, or OLED screen. This project helps beginners understand sensor timing and Arduino programming.
Obstacle Avoidance Robot
Ultrasonic sensors are widely used in robotics for obstacle detection. An Arduino-based robot can detect objects ahead, change direction automatically, and navigate unknown environments.
Smart Trash Can Automation
Using ultrasonic sensors, a smart dustbin can detect hand movement and automatically open its lid using a servo motor. This application is popular in smart homes, public hygiene systems, and contactless automation solutions.
Gesture-Controlled Systems
By analyzing distance variations, ultrasonic sensors can detect hand gestures. Combined with Arduino, these systems can control lights, media players, and smart appliances.
Liquid Level Monitoring System

Ultrasonic sensors can measure liquid levels in tanks without physical contact. Arduino processes the data to display tank level, trigger alarms, and control pumps automatically. This is highly useful in agriculture, water management, and industrial automation.
Performance Advantages in Embedded Applications
Non-contact measurement
High accuracy for short to medium ranges
Works in low-light or dark environments
Affordable and widely available
Easy integration with Arduino
Design Limitations and Constraints
Performance affected by temperature and humidity
Not suitable for soft or absorbent surfaces
Limited range compared to LiDAR
Sensitive to angle and surface texture
Understanding these limitations helps in designing reliable projects.
Engineering Best Practices for Reliable Projects
Proper Calibration
Environmental factors affect sound speed. Calibrate your sensor to improve accuracy, especially in outdoor applications.
Stable Power Supply
Use a clean and stable power source. Voltage fluctuations can cause inconsistent readings.
Correct Sensor Placement
Avoid mounting near reflective or vibrating surfaces. Ensure the sensor faces the target object directly.
Optimized Arduino Code
Use non-blocking code techniques and add error handling to improve performance and responsiveness.
Ultrasonic Sensors Compared with Other Distance Technologies
Sensor Type | Accuracy | Cost | Light Dependency |
Ultrasonic | Medium–High | Low | No |
IR Sensor | Medium | Very Low | Yes |
LiDAR | Very High | High | No |
Ultrasonic sensors offer the best balance between cost and performance for most Arduino projects.
Emerging Trends in Ultrasonic Sensing
Integration with IoT platforms
Improved noise filtering algorithms
Compact waterproof sensors
AI-based object classification
Enhanced industrial automation use cases
As embedded systems continue to grow, ultrasonic sensing will remain a key technology.

Conclusion
Ultrasonic sensors combined with Arduino provide a powerful and flexible solution for distance measurement and automation. From beginner-friendly DIY projects to advanced industrial applications, this technology continues to evolve and expand its use cases.
By understanding the working principles, hardware integration, and best practices, developers can build accurate, reliable, and innovative systems. Whether you are a student, hobbyist, or professional engineer, mastering ultrasonic sensor Arduino systems opens the door to endless possibilities in embedded systems and IoT development.