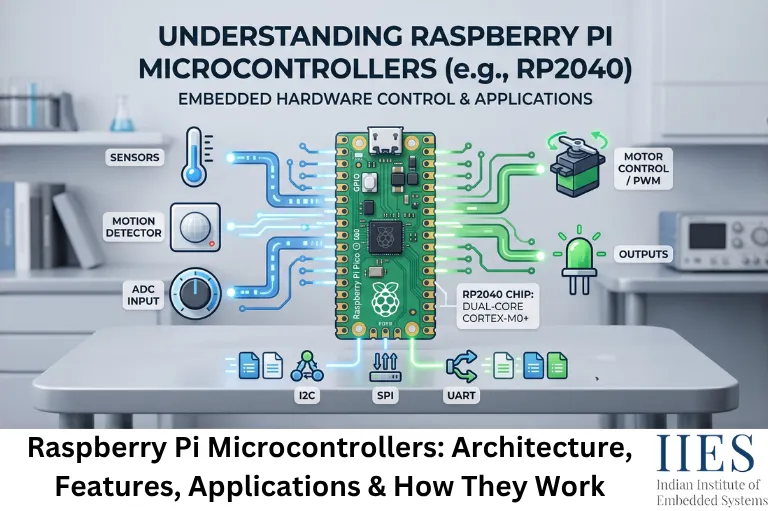
What Is a Raspberry Pi Microcontroller?
A Raspberry Pi microcontroller is a compact embedded controller designed to interact directly with electronic hardware.
The most well-known example is the Raspberry Pi Pico, which uses the RP2040 microcontroller.
Unlike a Raspberry Pi 4 or Raspberry Pi 5, the Pico does not operate as a general-purpose Linux computer. Instead, your program runs directly on the microcontroller.
Think about a simple embedded application:
A temperature sensor measures temperature → the microcontroller reads the sensor → software checks the value → a fan is switched ON or OFF.
That is a typical microcontroller task.
With a Linux-based Raspberry Pi, you could perform the same operation, but you would also have an operating system, background processes, storage, networking services, and many other layers.
For a simple hardware-control task, a microcontroller can be much more direct.
Raspberry Pi Computer vs Raspberry Pi Microcontroller
This distinction is important for every embedded-systems student.
Feature | Raspberry Pi Computer | Raspberry Pi Microcontroller |
Example | Raspberry Pi 4 / 5 | Raspberry Pi Pico / RP2040 |
Operating system | Usually Linux | Normally no full OS |
Main purpose | Computing, networking, multimedia | Hardware control and embedded applications |
Boot time | Relatively longer | Very fast |
Power consumption | Higher | Lower |
Real-time control | Less deterministic | Better suited |
Storage | microSD or other storage | Flash memory |
GPIO control | Available | Core purpose |
Programming | Python, C/C++, etc. | C/C++, MicroPython, and other supported environments |
Typical applications | Servers, vision, robotics, edge computing | Sensors, motor control, automation, embedded devices |
This does not mean one is better than the other.
The correct question is:
What does the application actually need?
If you need a camera system running computer vision, a Raspberry Pi computer may be the better choice.
If you need to read a sensor every few milliseconds and generate precise control signals, a microcontroller may be the better fit.
Understanding the RP2040
The RP2040 is the microcontroller developed by Raspberry Pi for the original Raspberry Pi Pico.
It is built around a dual-core Arm Cortex-M0+ processor and is designed specifically for embedded control applications.
The RP2040 includes features such as:
- Dual-core Arm Cortex-M0+ processor
- Up to 133 MHz operating frequency
- 264 KB SRAM
- Programmable I/O (PIO)
- GPIO interfaces
- PWM
- ADC
- Timers
- UART
- SPI
- I²C
- USB
For a student, one feature deserves special attention: PIO, or Programmable I/O.
PIO allows developers to create custom hardware interfaces using dedicated state machines. This is useful when a conventional peripheral does not provide the exact timing or protocol behavior required by an application.
In other words, instead of forcing the CPU to handle every small timing operation in software, PIO can take care of certain I/O tasks independently.
That is a powerful concept to understand when learning embedded systems.
How Does a Raspberry Pi Microcontroller Work?
Let us look at a simple example.
Suppose we connect a push button and an LED.
The microcontroller follows a basic cycle:
Input → Processing → Output
The push button provides an input.
The firmware reads the GPIO state.
The program checks whether the button is pressed.
The GPIO output is then changed to turn the LED ON or OFF.
The same principle is used in much more complex systems.
For example:
Temperature Sensor → ADC → Firmware → Decision Logic → PWM → Fan
The hardware becomes more complicated, but the fundamental embedded-systems concept remains the same.
GPIO: The Starting Point for Embedded Students
GPIO stands for General-Purpose Input/Output.
If you are beginning embedded programming, GPIO is one of the first concepts you should understand properly.
A GPIO pin can generally be configured as an input or an output.
As an input, the microcontroller can read signals from devices such as:
- Push buttons
- Digital sensors
- Switches
- Motion sensors
As an output, it can control:
- LEDs
- Relays
- Control signals
- Other digital devices
Consider a simple button circuit.
When the button changes state, the GPIO input changes.
The firmware detects that change and executes the required action.
This sounds simple, but the same concept appears inside industrial controllers, automotive electronics, consumer products, and medical devices.
ADC and Reading Analog Sensors
Not every sensor produces a simple HIGH or LOW signal.
Many sensors generate an analog voltage.
For example, a sensor might produce:
0.5 V → low measurement
2.0 V → medium measurement
3.0 V → high measurement
A microcontroller needs an Analog-to-Digital Converter (ADC) to convert that voltage into a digital value that software can process.
This allows the firmware to calculate measurements and make control decisions.
For embedded students, the important flow is:
Analog signal → ADC → Digital value → Software processing
Understanding this signal path is more important than simply memorizing ADC terminology.
PWM for Motor and LED Control
Another important feature is PWM, or Pulse Width Modulation.
PWM allows the microcontroller to control the average power delivered to a load by changing the duty cycle of a digital signal.
For example:
20% duty cycle → lower average power
50% duty cycle → medium average power
80% duty cycle → higher average power
PWM is commonly used for:
- DC motor control
- LED brightness
- Servo control
- Fan control
- Power-control applications
Suppose you want to control the speed of a small DC motor.
Instead of continuously generating an analog voltage, the controller can generate a PWM signal and vary its duty cycle.
The motor then responds to the resulting average power.
This is a basic technique that appears in many real embedded products.
Communication Interfaces
A microcontroller rarely works alone.
It usually communicates with sensors, displays, memory devices, motor drivers, communication modules, and other controllers.
This is why interfaces such as UART, SPI, and I²C are fundamental embedded-systems topics.
UART
UART is commonly used for serial communication.
It is useful for:
- Debug messages
- Communication with modules
- Device-to-device serial communication
For a beginner, UART is often the easiest interface to understand because the communication model is relatively straightforward.
I²C
I²C allows multiple devices to communicate using a shared bus.
It is frequently used for:
- Sensors
- RTC modules
- Small displays
- EEPROM devices
Its address-based communication model makes it convenient when several low-speed peripherals must share the same bus.
SPI
SPI is commonly selected when higher-speed communication is required.
It is widely used with:
- Displays
- Flash memory
- Sensors
- ADC/DAC devices
Understanding the difference between UART, I²C, and SPI is an important step toward designing practical embedded systems.
Programming Raspberry Pi Microcontrollers
One reason Raspberry Pi microcontrollers are popular with students is the availability of accessible development environments.
You can work with languages and tools such as:
- C/C++
- MicroPython
- Raspberry Pi Pico SDK
- VS Code-based development environments
- Debugging tools supported by the platform
For learning embedded systems professionally, I recommend that students eventually become comfortable with C/C++, even if they begin with MicroPython.
Why?
Because embedded development often requires understanding:
- Memory
- Pointers
- Registers
- Interrupts
- Bit manipulation
- Peripheral configuration
- Timing
- Hardware abstraction
MicroPython can help you understand the hardware quickly.
C/C++ helps you understand what is happening closer to the hardware.
Raspberry Pi Microcontrollers and Real-Time Control
Here is where students should think beyond simple LED projects.
Imagine an industrial machine where a sensor must be monitored continuously.
The firmware may need to:
- Read a sensor.
- Check whether the value exceeds a limit.
- Trigger an output.
- Update a communication interface.
- Record an event.
These operations may need predictable timing.
Microcontrollers are particularly useful for such control-oriented workloads because their execution environment is much smaller and more deterministic than a general-purpose operating system.
This is one reason microcontrollers continue to be widely used even though single-board computers are becoming more powerful.
Raspberry Pi Pico in Embedded Projects
The Raspberry Pi Pico is useful for learning and prototyping a wide range of projects.
For example:
1. Home Automation
A Pico can read switches and sensors and control outputs such as relays, LEDs, or other actuators.
2. Environmental Monitoring
You can connect temperature, humidity, pressure, or other sensors and periodically collect measurements.
3. Robotics
Microcontrollers are commonly used for low-level motor and sensor control.
A larger computer can handle navigation or vision while a microcontroller manages time-critical hardware control.
4. Industrial Prototyping
Students can develop small control systems involving sensors, actuators, displays, and communication interfaces.
5. Data Logging
A microcontroller can collect sensor values and store or transmit the information for later analysis.
6. USB Devices
Because the RP2040 includes USB support, it can be used in projects involving custom USB-based devices and interfaces.
Raspberry Pi Microcontroller in Robotics
Robotics is a particularly good example of why microcontrollers remain important.
Imagine a mobile robot.
A higher-level computer may process:
At the lower level, a microcontroller may handle:
- Motor PWM
- Encoder inputs
- Sensor timing
- Emergency stop signals
- Low-level actuator control
This creates a useful division:
High-level computing → decision making
Microcontroller → real-time hardware control
Students entering robotics should understand this architecture because modern robotic systems frequently combine multiple processing platforms.
Advantages of Raspberry Pi Microcontrollers
Raspberry Pi microcontroller platforms have several advantages for embedded development.
Simple hardware control
GPIO, PWM, ADC, timers, and communication peripherals are directly accessible.
Low-cost development
The Pico platform is inexpensive, making it practical for students and laboratories.
Strong learning platform
A student can progress from a simple LED project to sensor interfacing, communication protocols, motor control, and more advanced embedded applications.
Flexible programming
Developers can choose approaches such as C/C++ or MicroPython depending on the project and learning stage.
Compact design
A microcontroller board can be integrated into small embedded prototypes where a complete Linux computer would be unnecessary.
Limitations You Should Understand
A good embedded engineer does not only study advantages.
You also need to understand the limitations.
A microcontroller is not a replacement for a Linux computer.
For example, a microcontroller is generally not the right platform for tasks such as:
- Running a full desktop environment
- Heavy image processing
- Large database applications
- Complex web servers
- Large-scale machine-learning workloads
Similarly, a Linux Raspberry Pi computer is not always the best choice for simple deterministic control.
The correct engineering decision depends on processing requirements, timing, power, memory, connectivity, and cost.
Raspberry Pi Microcontroller vs Arduino
Students often ask:
“Should I learn Raspberry Pi Pico or Arduino?”
The answer depends on what you want to learn.
Arduino provides an extremely beginner-friendly ecosystem and is excellent for understanding basic embedded concepts.
Raspberry Pi Pico provides a powerful microcontroller platform with features such as the RP2040’s dual-core architecture and programmable I/O.
Rather than treating them as competing technologies, think of them as different learning platforms.
A strong embedded engineer should be able to understand the underlying concepts regardless of the board:
GPIO → timers → interrupts → communication → ADC → PWM → firmware → debugging
Those concepts transfer between microcontroller families.
Raspberry Pi Microcontrollers vs STM32
STM32 is another important family that embedded students should know.
STM32 devices are widely used across industrial, automotive, consumer, and other embedded applications.
Raspberry Pi microcontrollers can be particularly attractive for learning, rapid prototyping, and projects where the RP2040 feature set is suitable.
STM32 offers a very broad range of microcontrollers, peripherals, packages, and performance levels.
So the decision should not be based on brand popularity.
An engineer should evaluate:
CPU architecture + peripherals + memory + timing requirements + power + software ecosystem + cost + production requirements
That is the engineering mindset you should develop.
A Simple Learning Path for Students
If you are learning Raspberry Pi microcontrollers for the first time, do not jump directly into a complicated robotics project.
Build your skills step by step.
Start with:
- GPIO
Learn LED and button control.
- Timers
Understand delays, periodic tasks, and timing.
- PWM
Control LED brightness and a suitable motor driver.
- ADC
Read an analog sensor.
- UART
Send debugging information to a computer.
- I²C and SPI
Interface with external sensors and displays.
- Interrupts
Learn how firmware can respond to hardware events without constantly polling.
- RTOS concepts
After understanding bare-metal fundamentals, move toward tasks, scheduling, synchronization, and real-time software concepts where appropriate.
This progression is much more useful than simply copying ready-made projects from the internet.
Final Thoughts
Raspberry Pi microcontrollers provide a practical entry point into the world of embedded systems.
With a platform such as the Raspberry Pi Pico and the RP2040, students can work directly with GPIO, ADC, PWM, timers, communication interfaces, interrupts, USB, and real-time control concepts.
But do not stop at making an LED blink.
Use these projects to understand how an actual embedded product works.
When you read a sensor value, ask how the electrical signal becomes a digital number.
When you control a motor, understand how PWM generates the control signal.
When UART communication fails, learn how to identify whether the problem is hardware, configuration, timing, or firmware.
That engineering mindset is what turns a student who can build projects into an embedded engineer who can debug and design real systems.